
|
Continuing on the subject of the Vayus & their accompanying Mudras... let’s look at Apana Mudra the next, the gesture that helps to activate Apana Vayu. The key role of Apana Vayu is in supporting the eliminatory processes of the body & mind, from the physical such as bowel movement, urination etc. to the emotional like stress or anxiety relief. Apana Mudra helps to strengthen this Vayu - as elimination occurs, the body cleanses, which brings a purifying quality to this Mudra. Governed by exhalation, which supports the parasympathetic nervous system, & the downward flow of breath, this Vayu can give a relaxing & grounding effect too. 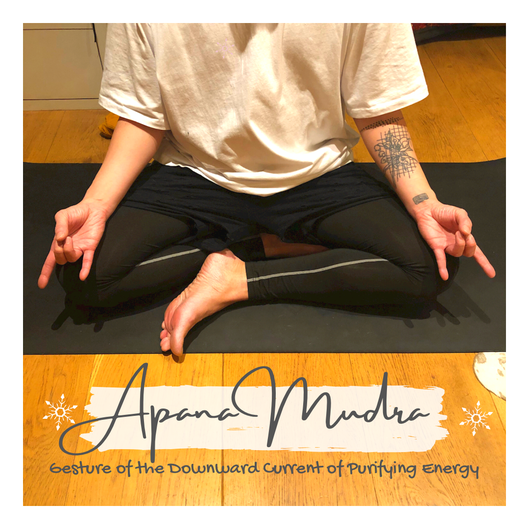 Apana Mudra Method - 1. Sat in a cross-legged seated position (refer to my recent post on how to find a comfortable seat) 2. Bring the tip of the thumb to the tip of the 3rd & 4th fingers; extend the 2nd & 5th fingers 3. Rest Mudra (palms facing up) on the knees & breath nasally 4. As you breath, pay attention to the effects of the Mudra to your body & mind
0 Comments
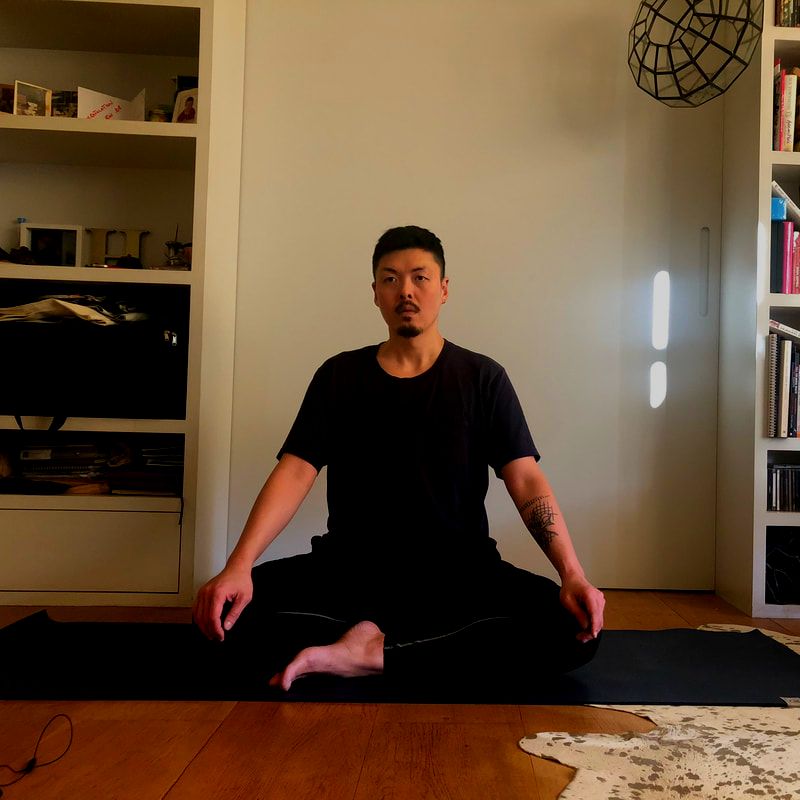
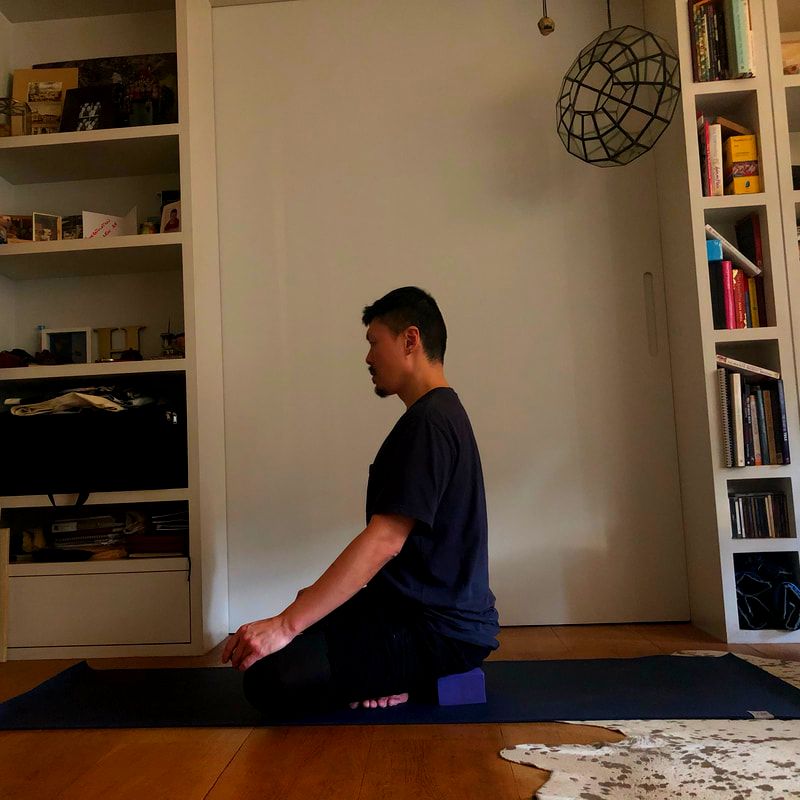
When we start the class in a Cross-Legged Seated Pose, I would typically spend a few good minutes suggesting the possible ways for one to sit up tall but with ease. This is crucial especially for practices where the body is stationary. Too relaxed and it becomes hard to stay awake, too alert and you may find it hard to internalise the experience. Finding the ideal seat removes the mental distractions caused by discomfort, and that helps you sustain the stillness involved in a pranayama or meditation practice.
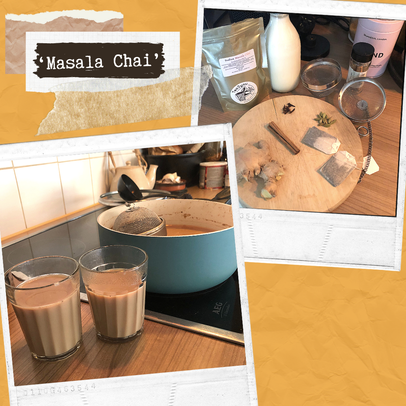
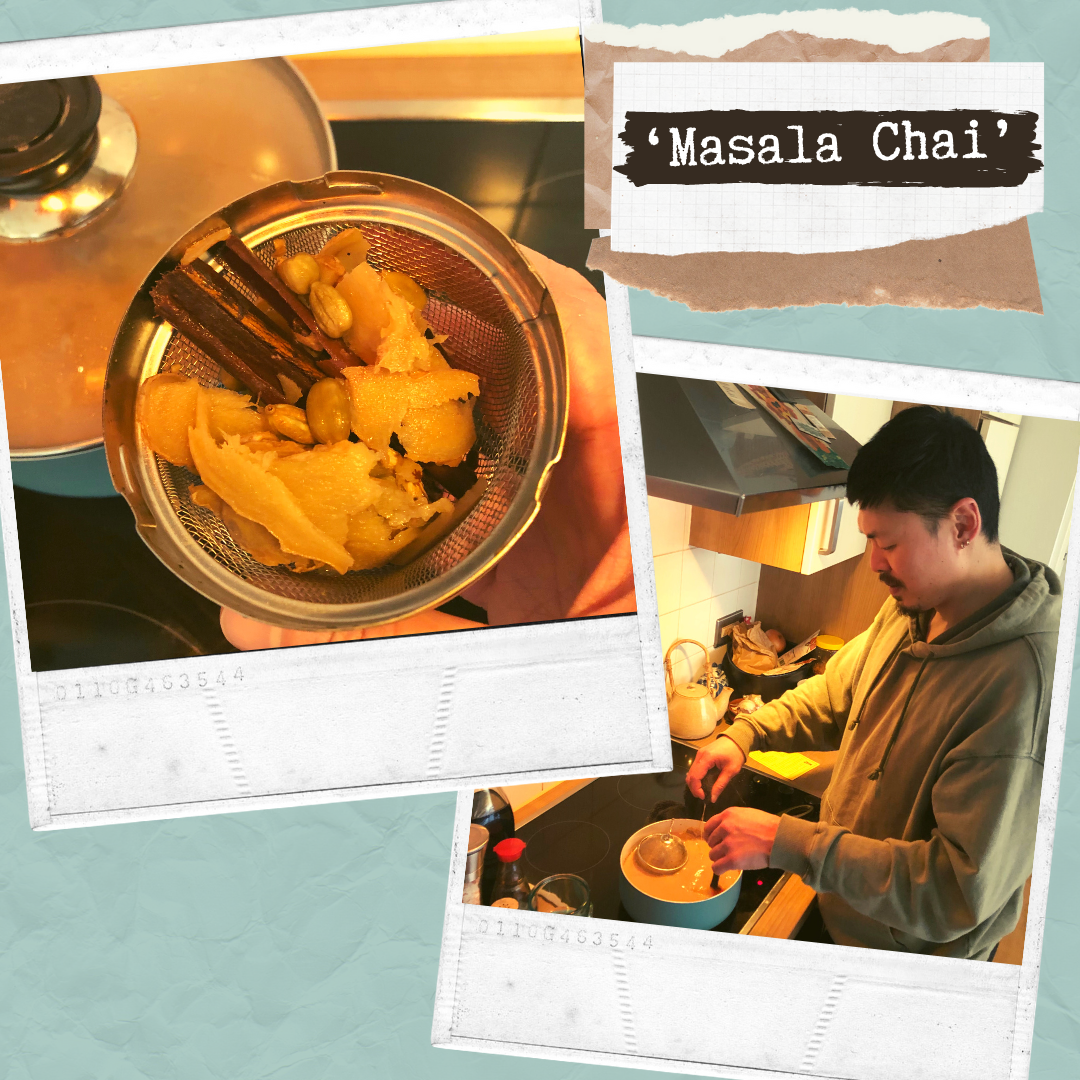
Tips on Finding Your Seat… 1. Use props - blocks, bricks, books, cushions, pillows... anything to lift the ground to you!!! Unlike in Eastern culture where we commonly sat on the floor so our hips may be more flexible in general; getting into and/or maintaining a cross-legged seat can be difficult for someone from the West who’s more used to sitting on chairs. In spite of this, practitioners often resist the help, choosing instead to bear the discomfort, but in time, the pain ripples through their body from the hip joints and/or lower back, and the agony is displaced to the shoulders or jaw where the tension manifests. Encourage and show them it’s acceptable, wise in fact, to use support. Lead by example, I always sit on a block whether I need to or not; it helps me stay in position for longer and gives permission to the class to find comfort in their seat. 2. Props help with posture & alignment. Sitting higher makes it easier for knees to settle in line or lower that hips so the pelvis feels more spacious. 3. Sit towards the edge of the prop, that way it tilts the pelvis forward slightly, creating space in the hips & helps with sitting up tall. 4. Give the shoulders a little roll up & let them soften down; creating that sense of space across the chest & upper back. 5. Get a feel for your head, perhaps it’s leaning forwards or tilting, so you may want adjust yourself such as drawing the head back or lightly dropping the chin towards the chest so it feels like it’s stacked above the spine. 6. Pay attention to the flow of energy in the body – you might notice a sense of grounding as the shoulders, hips and knees settle towards the earth, whilst on the other hand, feeling the sense of lift that rises from the base of the spine through the crown of your head. *Note: There’s several ways to sit cross-legged - calves across one another (Sukhasana), calves in front of the other (Muktasana), ankles on top of the other (Siddhasana) & calves over the other (Padmasana)... pick the most comfortable rather than most challenging or aesthetically pleasing option!! Remember - finding a seat that allows you to feel alert but relaxed at the same time is key to laying the foundation for your practice. In one of my posts a week ago, I introduced the relationship of yoga and breathing, via the 5 Vayus - life energy ‘currents’ that flow through and nourish areas of the body and their functions, maintained through our breath. Just as it is where there are ups & downs in life, there are always moments where some vayus are weaker than others, and when this happens, we may notice the functions being affected. To work on strengthening our vayus, one of the tools available in yoga therapy are hasta mudras - symbolic hand gestures that bring their own unique effects to the body and mind - and each vayu has a mudra that nurtures it. 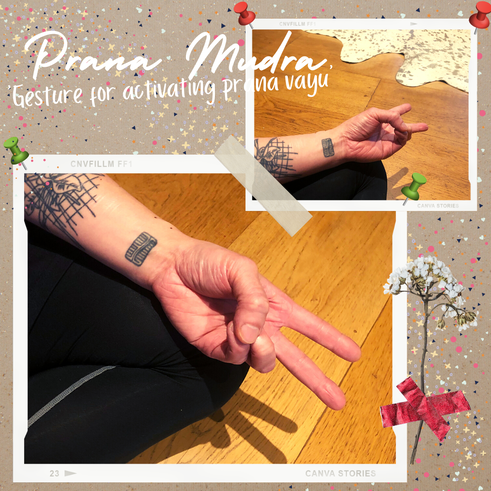 Prana Mudra Prana Mudra activates & enhances the flow of prana vayu, which supports the cardio-respiratory system. The mudra helps to increase breath capacity, especially with inhalation, cultivating vitality, energy & enthusiasm. Method - 1. Come to a cross-legged seat; breath from the nose & take a moment to observe your natural breath. 2. Rest hands on knees with palms facing up. 3. Curl 4th & 5th fingers in & place thumb over their tips. 4. Extend the 2nd & 3rd finger into a V-shape 5. Notice any changes to your breath or sensations in the body with this mudra. 6. Does the inhalation feel smoother or bigger? 7. To increase the energy of this mudra - keep the gesture but take the hands out to the side of the body. If you’ve visited India, you’d have come across Masala Chai teas. From fancy restaurants to the ‘chai wallahs’ aka tea vendors walking round with their flasks peddling to commuters... chai tea permeates all moments & all situations, & I love that something so delicious is equally available & accessible to the rich as well as the less privileged to enjoy. The history of chai is debated & there’s several versions, one of which is that it’s an Ayurvedic drink that was developed by Indian royalty centuries ago to aid mild ailments. Tea wasn’t even a part of the ingredient until the 1900s when the British owned Indian Tea Association promoted the drinking of tea to India. However, tea leaves were incredibly expensive so to keep costs down, vendors combined it with sugar, spices & milk to keep it flavourful. Development of mass industry in the 60s brought along the Crush, Tear, Curl (CTC) production of tea leaves, which made tea a much more affordable ingredient, as a result, chai began to grow in popularity amongst them masses. While there are certain staple ingredients, every family & food joint likely has their way of concocting their version of chai while staying faithful to the sweet, milky tea flavour with varying degree of heat & spice. I’ve tried to make quick versions of chai but I’ve found that it’s most delicious & flavoursome when boiled & simmered for a short period so the spices are infused with the milky tea.
2. Lower the heat & simmer for a few minutes until you start to catch a scent of the spices 3. Add the milk & sugar, bring the concoction to boil but once it starts boiling, take it down to simmer again 4. This time, let it simmer for longer (10-15 mins), stirring it occasionally to allow the flavours to infuse You’d began to notice the scent of the spices becoming more pronounced A skin will form - just stirred it away, otherwise it can be filtered out later 5. Taste - perhaps you want it sweeter/spicier/more milky/stronger tea - adjust to your liking If you’ve added some ingredients, let it simmer a bit more 6. Strain the solids (if required) & serve the beverage hot To put it quite simply, breathing keeps us alive, it’s a function that the body performs instinctively, yet in this discipline, we are encouraged to cultivate greater awareness for the system through breath-work. Why is that? The practice of breath in yoga is known as Pranayama. Prana = life force & Yama = control, however Ayama can be translated as ‘to extend’, so some would consider it as the practice of breath control or the practice of extending the breath. Yoga consolidates the practice of body, breath & mind through Asana, Pranayama & Meditation. Yet what I find oddest is the amount of yoga teachers who turn to a completely different method for their breath practice. Pranayama has not only existed for longer, the range of techniques is extensive & each one offers a different type of support; naturally there’s one that complement Asana practices. In yoga therapy, we study a person’s breath to evaluate how it’s affecting his/her Prana Vayus, which would be the ‘currents’ of life force energy that run throughout our bodies.  Prana Vayus There are 5 x Vayus, with each one governing an area of the body whilst maintaining a specific set of functions -
The lower back’s often forgotten when strengthening the core muscles, quite simply because, it’s seldom within our view & there aren’t obvious visual results to motivate a person to put effort in the area. But many of us have probably experienced some form of lower back ache, perhaps for sitting too long or leaning over for a period... and these pains can be debilitating and frustrating. At those moments, the body feels like it’s crying for a massage. Stretching may bring relief indeed but it’s often temporary. When we put ourselves in that position again, these aches return. So what can we do to help? 1. Become more aware of our posture! How we hold ourselves & notice the positions that tend to aggravate & take preventive measures. 2. Strengthen the area!! This may seem obvious but it’s rarely the solution a person thinks of. Use muscular support to alleviate some of the load on the lower back. I come across so many people who have no lack of ideas on how to strengthen their frontal abdominals but when I ask them what they do for their lower backs, I get a blank stare. It’s telling if they even exercise the area. Salabhasana is a relatively accessible pose for most as you’re only working against your body weight.  Method: 1. Start by lying on the front with legs extended 2. There are several options for the arms... - arms by the side of body - arms extended to the front - arms by the side of head (as pictured) 3. There are several options for the legs too but the common ones are... - feet together - feet hip width apart 4. Different placements have different effects on the body 5. Inhale > engage core & lift knees, chest, shoulders, elbows & palms 6. Exhale > lower back down Notes: *the tendency is to pull up from the neck to lift as it feels like we’re going higher; relax the neck & focus on lifting from the chest **the higher you lift ≠ the stronger the pose. At some point, you’re impinging on the back; instead a slight lift & lengthening in opposite directions (refer to arrows in photo) will activate the muscles across the back sufficiently In a recent interview with La Pochette (https://lapochette.co/blogs/le-journal/fashioning-a-new-path), they asked if I could suggest a simple breathing technique that their viewers may use in stressful moments... one of the best ways to calm our nerves is to lengthen our exhalation, as we breath nasally down to the belly.
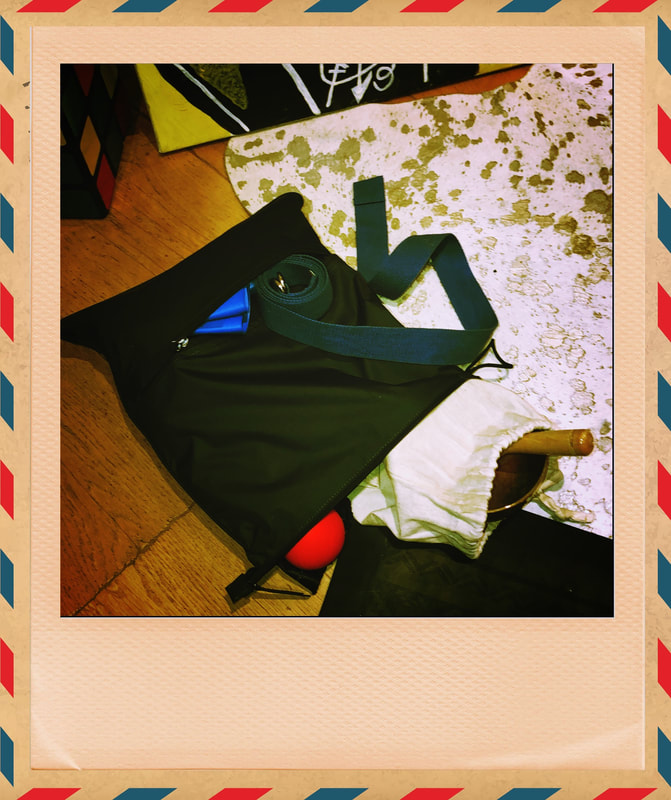
[ 6-Count Breath with Hakini Mudra ] In Yoga Therapy, we consider if a treatment needs ‘Bhramana’ or ‘Langhana’ qualities, in other words, if it needs to energise or unwind. Inhalations are intrinsically ‘Brahmana’, i.e. nourishing, whilst exhalations are ‘Langhana’, i.e. cleansing, hence why longer breaths out encourage release. By adopting Hakini Mudra, ‘Gesture of the Goddess Hakini’, we invite balance & harmony to all levels of our being & enhances the circulation throughout our systems. Nasal breathing slows the pace down & when we breath into the belly, we activate the vagus nerve (which runs from the abdomen through the organs to the brain) whose function is to regulate the parasympathetic nervous systems, which manages the ‘rest & digest’ response in the body & mind. Hence why, this simple technique may soothe & offer a sense of calm at moments of anxiety. *An instructional video of this breathing practice is posted on my Instagram & Facebook. Click on the icons below to be redirected. Take note that the practice can also be done seated too. **Sweat Bag in Ink by La Pochette featured here LA Pochette’s mission is to remove ‘hidden’single use plastic from our daily lives. They adopt a circular approach to design, transforming waste into high performance fabrics that’s intended to last. This bag I’ve been using is a great example & is made from 100% recycled plastic bottles. To purchase one at a 15% discount, use my code hongyihuang15 (valid till 28 Feb for 1 use per person)
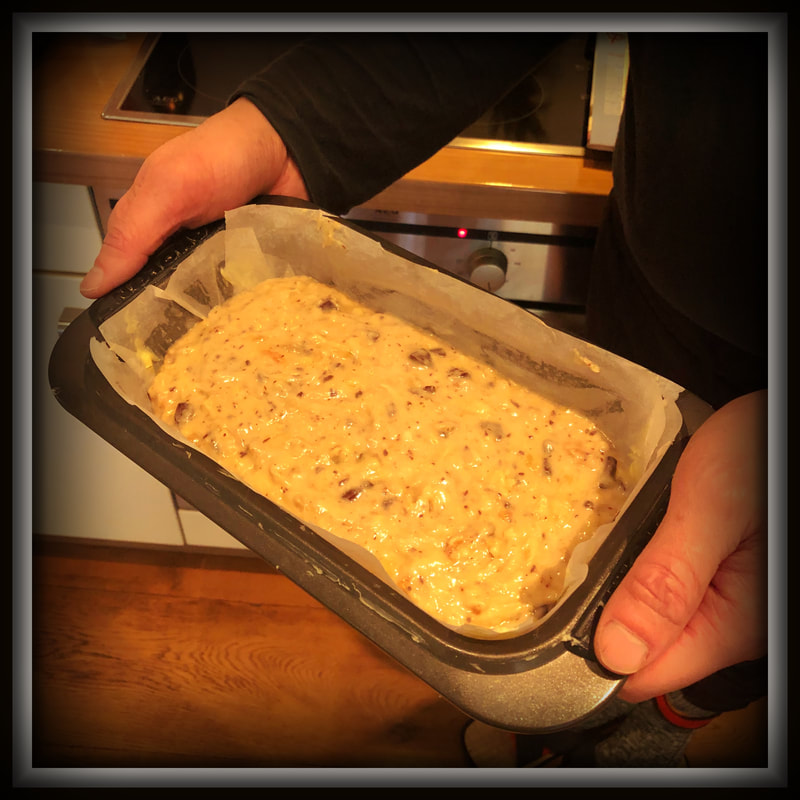
Since we’re on the subject of the core muscles, it would be a great opportunity to look at some poses where the core is habitually disengaged. Utthita Parsvakonasana aka Extended Side Angle – an asana that’s popular and universally taught throughout vinyasa classes. Typically, we transition into the pose from Virabhadrasana II (Warrior II), so the front knee is bent while the back knee stays straight, with hips and chest side-facing and arms reaching out in opposite directions. Without going into too much detail… moving into Utthita Parsvakonasana – the instruction will be to lower the front elbow to knee while the top arm extends over the head. What tends to happen is that students would lean from their elbow into the knee, essentially using the knee to support their body weight. You may even notice the curving in of the lower side torso as a result from leaning. Sadly, this compromises the intention of the pose. In Extended Side Angle, one should experience the sensation of elongating, not only from the top side torso by the lower side too. To create length, start by grounding through the feet to bring steadiness to your stance. Activate the core muscles using that bracing action, squeezing in the entire trunk area. With core engaged, the upper body feels sturdy and instantly lifted. Find lightness in the elbow that rests on the knee; this feeling of contact adds to the overall stability of the pose. Extend through the top arm and reach through the fingertips. 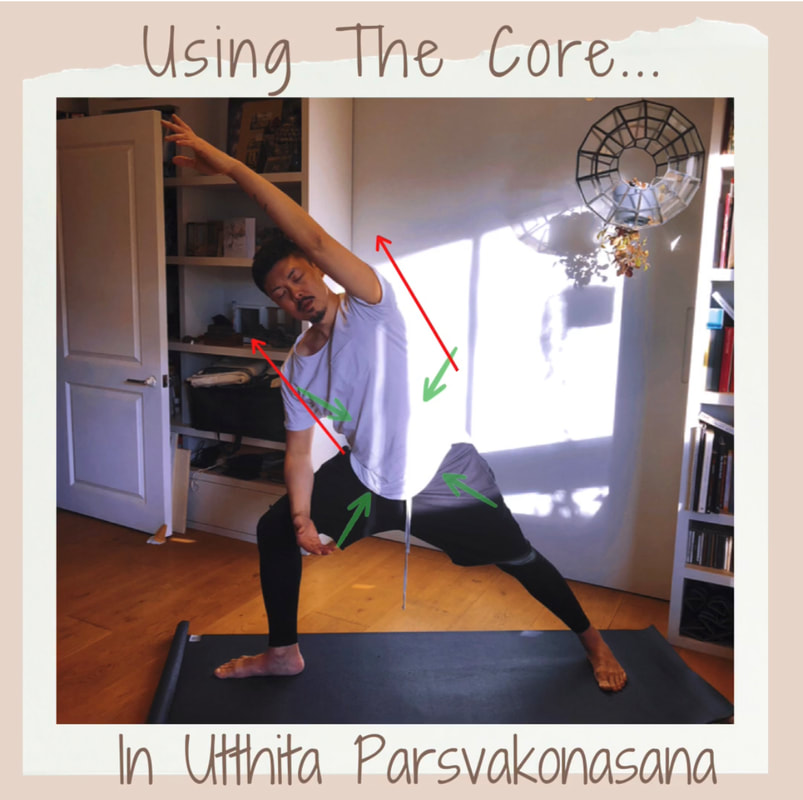 The mention of core muscles would lead most people to think of those coveted ‘washboard 6-pack’ but with any exercise or movement discipline, this reference goes beyond the front abdominal muscles. Emphasis on the core is common in many physical disciplines. Why is that? Many people trained for aesthetic and strengthening reasons, though it’s not unusual to see them overly focusing on the frontal area in a bid to achieve these ‘washboard abs’. Perhaps we tend to notice only what we can see, forgetting that we’re 3-dimensional beings after-all. The word ‘core’ indicates centre or the heart of an object and we’re forgetting that our core muscles would include the sides and the back of our body too. In other words, the core muscles are like a belt that wraps around the trunk of our body, it’s key function which is to offer stability and equilibrium, supporting the spine from excessive load and consequently preventing the ease to injuries. It acts as a link between upper and lower body, bridging the action/reaction relationship between top and bottom. 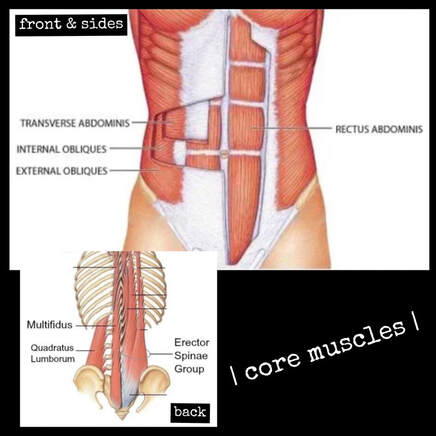 To better understand this area of the body, I’m focusing on a few key areas of the core… [ Front & Sides ] Rectus Abdominis – frontal superficial abdominal muscle (the washboard abs in other words…) that supports forward folding movements and is strengthened by crunch exercises. External Obliques – frontal side abdominal muscles that’s strengthened through side-bending and opposite side rotation movements. Internal Obliques – Muscles that wrap around the waist, lies under the external obliques and above the transverse abdominis, supporting side-bending and same-side rotation movements. In other words, during a twisted-crunch exercise where the left shoulder rotates to right hip – muscular contraction occurs in the right internal oblique and left external oblique! Transverse Abdominis – Deepest side abdominal muscles; considered one of the most important component of the core whose function is to compress and provide stability. Activated through hollowing or bracing actions such as maintaining an overall squeezing action of the core during High Plank. [ Back ] Multifidus – Series of small muscles that travel from base up the length of the spine; supports spinal extension and rotation so asanas such as Bird Dog is strengthening for the area. Erector Spinae – A group of back muscles that run from sacrum to base of the skull; supports extension and side-bending actions of the spine hence it’s strengthened by poses such as Salambasana or Utkatasana. Quadratus Lumborum – Deepest abdominal muscle in the lower back, between the top of pelvis and lowest rib. Supports side-bends and extension of the spine, so it’s strengthened by poses such as Vasisthasana. NYE has always brought an air of optimism and positivity, but the streets which are typically alive with celebration felt abandoned last night, its emptiness made more apparent by the mist from the fog. 2020 has been a year like no other… we’ve learnt to entertain and occupy ourselves within the confines of our walls, and many have found the joy in cooking. I certainly appreciate the time to make my own meals from scratch but I also love making dishes out of excess ingredients or leftover food. This Christmas, we found ourselves receiving plenty of gifts of chocolate. Consuming them all on their own however, would be a stretch so I’m using it as an ingredient for a dessert. Banana breads are one of my favourite sweets as they taste best when made with the fruit that have gone soft and no one wishes to eat. The bake is sweetened and scented by these ripened, mashed bananas, and in this recipe, I’m using the excess chocolate I’ve received plus walnut pieces to further enhance its taste and bite. To view the recipe and baking instructions, go to my blog on hongyitheyogi.com. Wishing all a Happy New Year and a year to look forward to!!! x 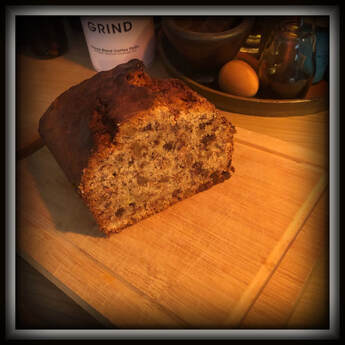
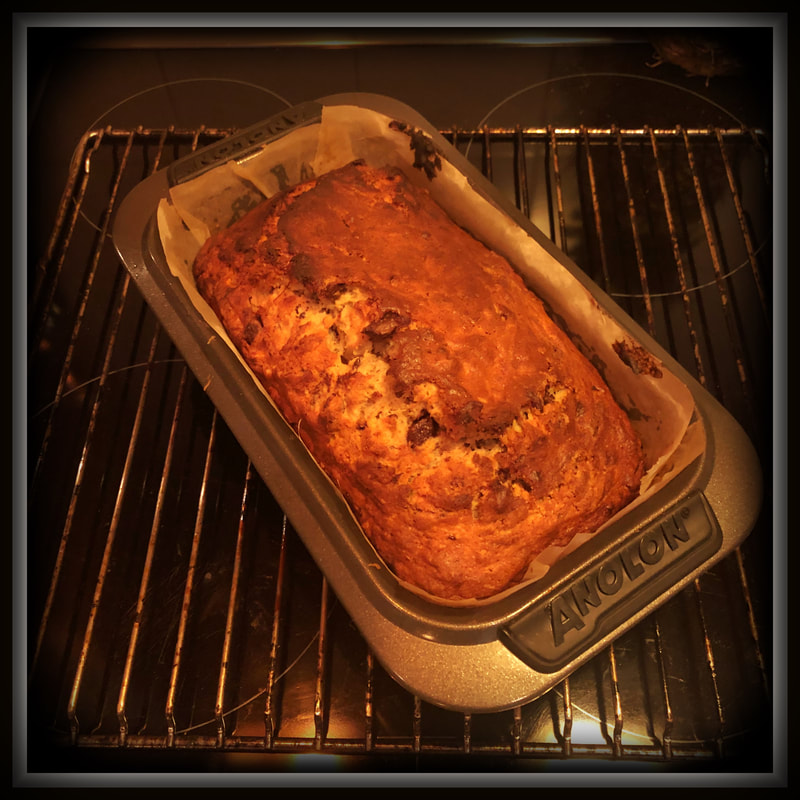
Banana Bread with Dark Chocolate & Walnuts 2-3 ripened, soft bananas (roughly mashed) 100g walnuts (chopped into small pieces) 75g dark chocolate (diced into small chunks) 2 x eggs (beaten) 250g self-raising flour 100g unsalted butter (melted and cooled) Pinch of salt (I used pink Himalayan salt but any type would work) 150g caster sugar Preheat fan oven at 180°C. Combine the flour, salt and sugar into a big mixing bowl. Add the cooled, liquified butter. Give it a quick stir, followed by the beaten eggs, this time mixing all the ingredients up well. Once the mixture is of a good, pasty consistency, you can add the remaining ingredients – mashed bananas, chocolate chunks and walnut pieces. Stir in thoroughly, ensuring that these ingredients are evenly distributed throughout the bread mixture. Prepare your loaf tin, glaze with butter and line it with baking paper. Pour the mixture into your loaf tin, place it on a medium shelf and bake for 50-55 minutes. Remove when time is up and check that the bread is baked through by inserting a cocktail stick or thin metal pin down the centre. Allow to cool for 5 minutes, then remove it from the tin and sit the loaf on a wire rack to cool it down completely. Banana Bread with Dark Chocolate & Walnuts is ready to serve. Eat on its own or have it toasted with jam. *A shorter version of this story appears on my Facebook and IG posts. Please follow me by clicking on the icons below. |
Hongyi the yogiFull-time yoga teacher & trainee yoga therapist in London. Eager to share, eager to learn! Archives
July 2021
Categories |

 RSS Feed
