
|
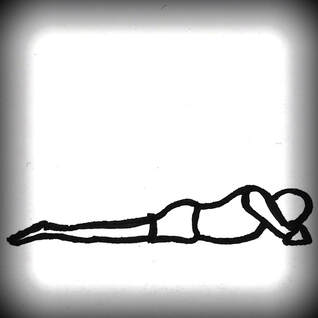
In many disciplines such as Yoga, Pilates, Tai Chi, Qi Gong, the practice directs the student to breath with the diaphragm. Why is that so? When we breath using the diaphragm, the rib cage expands to create movement in the belly and this manner of breathing can feel soothing and calming. This is because of the vagus nerve that runs from the abdomen through the organs to the brain whose function is to regulate the parasympathetic nervous system, which supports the ‘rest and digest’ response in the body and mind. Diaphragmic breathing is considered a technique that needs to be learnt and exercised, but in fact, the diaphragm is the primary muscle that supports the respiratory system. Humans and animal breath with it instinctively from birth; notice a cat or dog at rest, or a baby and how their belly rises and falls as they breath. It’s during our lifetime that external, emotional and psychological factors affect changes to our initial breathing habits and as adults, we are having to re-train ourselves to breath with the diaphragm again. However, students do find it difficult to reconnect with this manner of breathing especially when they’ve habitually breathed in a different way for many years. One of the best ways, to teach ourselves to breath diaphragmatically and connect with that feeling of movement in the ribs and abdomen is through Makarasana (crocodile pose) and allow the sensation of touch to guide our breath.
Method – 1. Lying on the front with hips and belly on the ground, legs extended and feet no wider than the hips; fold arms across and rest forehead on forearms, providing some space between the face and the mat. 2. Without attempting to control your breath, simply breathing through the nose. Let it flow naturally and effortlessly, observing its pace and rhythm as it moves it and out of the body. 3. Shifting your attention to the abdomen; let the sensation of your belly in contact with the ground guide your breath. Notice how it expands towards the mat as you inhale, softens down as you exhale. Relax the muscles in the belly as you breath and allow the movements to the area to become deeper and more soothing. 4. Gradually move your awareness to the sides of the rib cage, particularly the bony area around the lower ribs. Notice them expanding out to the sides as you inhale and contracting as you exhale. 5. This is the result of diaphragmatic breathing – inhalation causes the diaphragm to contract and the rib cage to expand, exhalation relaxes the diaphragm and moves the ribs back inwards.
0 Comments
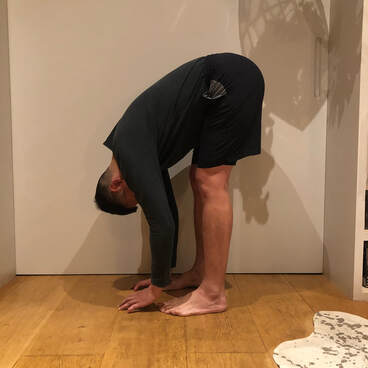
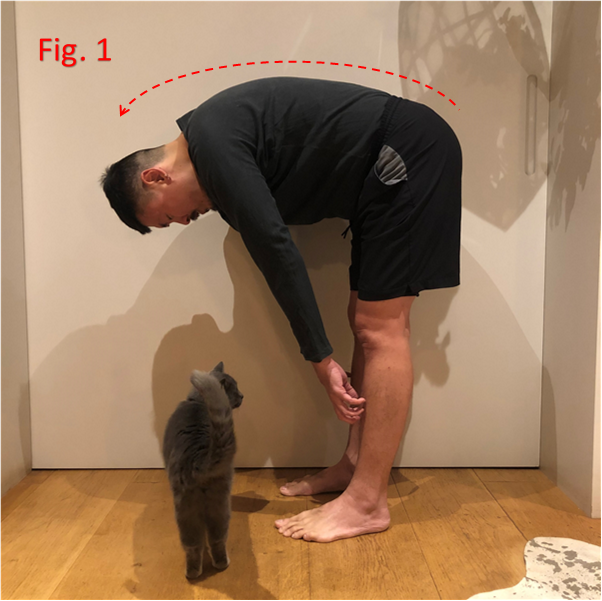
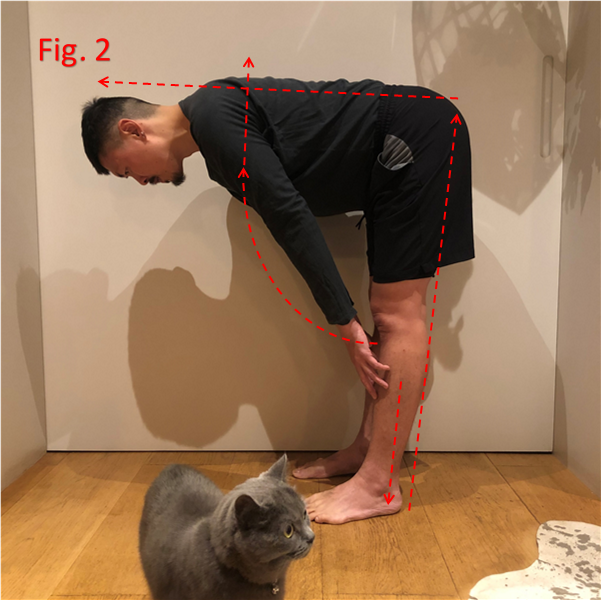
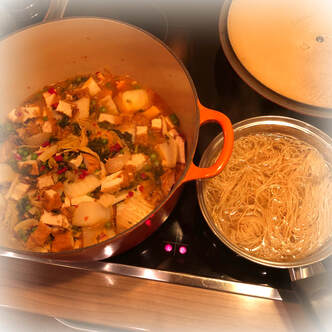
With the temperature starting to dip, Le Creuset that had been hidden away above the kitchen cabinets had started to make an appearance again. Winters are truly the perfect months for soups & stews; warming, hearty, cosy... not only do they offer flavour but there’s a homeliness associated to soups & stews that draws out an emotional reaction. I personally have a huge fondness for soups; never too challenging to prepare, may require lots of chopping though the ingredients are likely to all end up in a single pot. Left to simmer & cook, only needing the occasional stir to avoid getting the ingredients burnt to the pan... soups are pretty fail safe and unlikely to ruin!! Besides, they keep well in the fridge & their flavour enhances over time! This particular soup has Scottish roots -a childhood fave that my partner has shared with m - a chunky vegetable broth enriched by the smoky saltiness of ham hock, simple yet bursting with earthy flavours from the combination of different root vegetables. 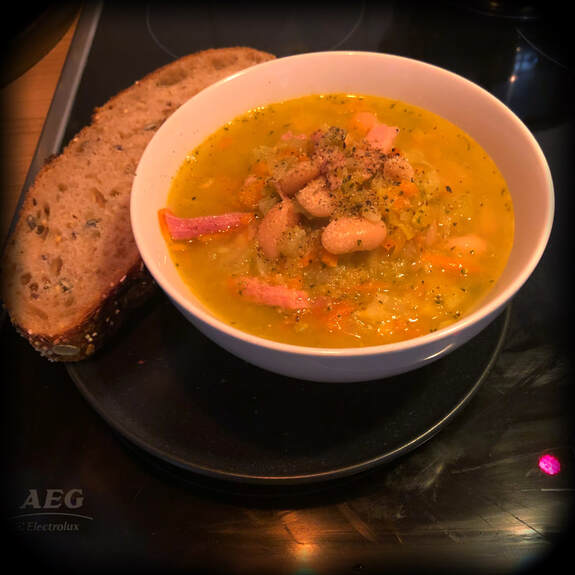 Winter Veg + Ham Hock Soup 3 x Potatoes 3 x Large Carrots 2 x Large Leeks 1 x White Onion 2 x Cloves of Garlic 1 x Small Turnip 2 x Tins of Butter Beans 1 x Broccoli 1 x Smoked Ham Hock 1. Roughly dice the onions & garlic + slice leeks about 1cm thick. 2. Heat a generous knob of butter in your Le Creuset or any deep stewing dish. Once soft, add all the ingredients above in Step 1, mix it through & let them sweat in the butter. 3. Grate 2 x carrots, 2 x potatoes & half turnip, roughly chop the remainder. Add it all into the pot of cooking ingredients and mix in well. 4. Boil water and fill the dish until the ingredients are covered. Add the ham hock, making sure that it’s fully submerged in the water. 5. Turn the heat up and once the soup begins to boil, bring it down to a simmer. 6. Cover the pan with a lid & let it simmer at low heat for 2 hours, stirring and checking it regularly to ensure that the ingredients are not burnt at the bottom. 7. At 1.5 hours, remove the ham hock (it should have softened, if not, simmer for a bit more), set it aside to cool. 8. At the same time, break the broccoli into florets and add them into the soup. Drain the butter beans and mix them in too. 9. When it’s cool enough to handle, shred the amount of ham hock you would like to add and stir in with the broth to warm it up. Set the remainder aside as it can be used for other recipes (sandwiches, salads, omelettes...) 10. Serve with toasted bread or crusty baguette It’s common to find practitioners struggle with activating the spinal muscles while moving through a Vinyasa class, in poses like Virabhdrasana III (Warrior 3) and/or Ardha Uttanasana (Halfway Lift), and I put this down to 2 main reasons. Firstly, the engagement of these muscles can be a rather unfamiliar sensation, and it’s often evident when students return with a blank stare when I point them towards this activation. It’s not a feeling that our body is used to and not what we regularly use in our day-to-day activities, unlike lifting an object, we’re familiar with the using of muscles in the arms. Secondly, the activation of these muscles happen through subtle movements, so it often goes unnoticed if we’re not paying attention to them, using the example of lifting with the arms, that’s a prominent and obvious action in contrast and easy to notice in our own bodies. But to activate the muscles in our back isn’t a difficult thing to do – many of us can find this feeling through Salambasana (Locust), it only becomes hard when those muscles are not the primary focus of the pose. Looking at Ardha Uttansana (Halfway Lift) today - this pose appears twice during Surya Namaskar A (Sun Salutation A) – at the start of the sequence and then again, at the finishing of the sequence. Offering strengthening and lengthening qualities from the heels to the crown of the head and also the hips, the pose is alive, full of activation throughout the entire back of the torso and lower body. The pose is alive, full of activation throughout the entire back of the torso and lower body. However, what’s often
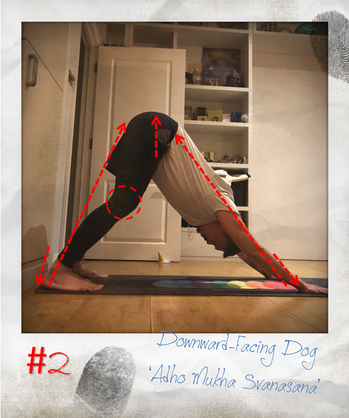
* Red arrows represent energetic lines above Method – 1. From Uttanasana (Forward Fold), ground through the feet, especially heels, this is to close the kinetic chain in the body 2. Draw in the belly (to activate core muscles) 3. With heels grounded and core engaged – take a breath in as you slide arms up to knees, lifting the chest up halfway to lengthen the spine forwards (this should give a feeling of muscular contraction as the back of the body and legs activate) *lifting the chest is key as it brings the muscular activation in the back. The common instructional mistake is that students are asked to lengthen their spine forwards – that is the movement of the body and not the action that creates engagement. 4. On exhalation, letting all of the muscular engagement go and allow the body to drape forwards, creating a feeling of lengthening from the heels to pelvis, and from base of spine to crown of the head. **a part of this story appears in my IG post, to follow me, click on the icons below - On the subject of food and nutrition during Yoga Therapy training, our lecturer made a statement which really took me by surprise – she advised that instead of throwing out vegetables that are starting to yellow, we may want to consider eating them as the process of yellowing actually produces certain nutrients that aren’t present when their green! My partner can attest, I’ve always been one to try to use up every leftover ingredient in the fridge, past their sell-by date, so long as they’ve not began to mould. The post-war generation of Chinese are big on not wasting food. This attitude has been passed down from grandparents to parents, then parents to children; though it’s doubtful if its influence continues with the new generation, it’s certainly etched into my mindset. I still remember vividly – after emptying what’s leftover in the rice cooker – my elderly nanny used to pour hot water down the cooker dish. The purpose is to soften the remainder grains that were caked to the walls of the dish. She would scrape the grains off and eat them like a rice congee. Not a single grain ever goes to waste, as she often teaches us the importance of appreciating the food that’s available to us, but also to understand how painstaking it actually is to grow and produce rice. The need to not waste, perhaps it’s one of the reasons why, the Chinese have developed recipes and cooking methods that are particularly suited to turning stale ingredients delectable. Braising is a great example, less common in English cookbooks but certainly a method that appears in French cooking. It’s uncertain who originated the technique but it’s one that serves this purpose well! In braising, you sautéed the ingredients at high heat for a quick moment and then finish the dish by covering and simmering it, in a small amount of liquids, for a longer period. Flavours between ingredients and condiments are infused and enriched by one another with this method of cooking, and the results are usually rich in flavour.
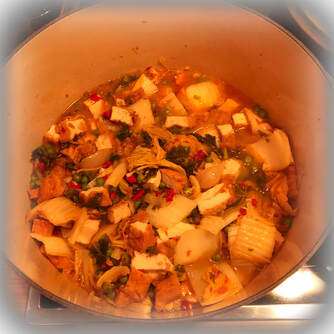
 ~ A Braised Pot of Leftovers ~ *All of the ingredients used here were headed for the compost bin. They were remaining quantities from other recipes. As such, the quantities for this dish can vary and you can always add/remove ingredients that are (un)available. Ingredients – 1 x White Onion (diced in chunks) 3 x cloves of garlic (chopped up finely) 2 x red chillies (roughly chopped up) Kale (roughly chopped, stalks removed) Chinese Leaf (chopped in large pieces) Firm Tofu (diced in large cubes) Frozen Peas Miso Paste Douban Jiang aka Chilli Bean Sauce (made from fermented soy beans and chilli) Stock (chicken or vegetable) Sesame Oil Brown or Cane Sugar Cooking Oil *Optional ~ Handful of dried shrimp (finely chopped) Handful of dried scallops (crumbled) 1. On the hob – at medium-high setting - heat the cooking oil in a deep dish/cooking pan for 1-2 mins 2. Once the oil is hot, add the garlic, onions, chillies, *dried shrimp and scallops (optional ingredients) that you’ve prepared. Toss them in the oil and fry for a few seconds, taking care not to let them burn. 3. Turn the heat down. Add a dash of water as you put the lid on and let the ingredients soften inside. 4. Add the kale and toss it well with the rest of the ingredients. Put the lid back on and let it simmer for a minute. 5. Then the Chinese leaf – just as above – stir it in thoroughly with the rest. Put the lid back on and simmer for a couple of minutes. 6. Mix in the frozen peas next. Add a splash of chicken/vegetable stock, cover and simmer, this time for longer 7. Check the pot regularly, lifting the lid and giving the ingredients a stir so they don’t burn or stick to the bottom. You want to make sure that it’s simmering and not boiling. The ingredients should always be cooking in a small amount of liquids. 8. With braising, the ingredients are cooking in a covered pot so the liquids are evaporating, condensing on the lid and returning back to the ingredients. At a low heat, you are essentially cooking the foods in their own fluids. 9. Add more stock if the liquid is drying up, you probably will need to top up 2-3 times during the process. If the liquid’s evaporating all the time, it could mean that the heat is too high and you may want to turn it down. 10. When you notice that the vegetables have softened, add the condiments – the chilli bean sauce, miso paste, sesame oil and a bit of brown/cane sugar. Salt, if desired. 11. Mix in the tofu cubes and stir in well with the rest of the ingredients. 12. Cover and simmer for a few minutes; test to see if it’s ready to serve – the Chinese leaf is a good indicator, it captures flavours well and should taste like an infusion of the flavours in the pot. 13. Serve with rice or noodles. *A section of this post appears on my IG, click on the icons below to follow me! 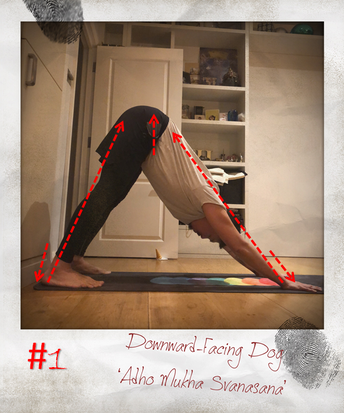 There’s no other pose that’s more strongly associated to modern yoga as Downward Facing Dog, aka Adho Mukha Śvānāsana in Sanskrit. So recognisable that it’s often the asana of choice to illustrate or accompany yoga-related features and promotions. Commonly referred to in short as ‘Downward Dog’ too, it’s obvious that the name of the asana (Sanskrit word for pose) comes from its shape, which resembles the action a dog getting up to stretch out across the torso from lying down. So widely practised that it’s almost inevitable for any practitioner to encounter this pose in a hatha yoga, especially Flow or Vinyasa style classes. The pose itself sits within the family of inversion and is considered one of the more accessible option within this category. In flow-style practices, it’s often thought of as neutralising; a restorative posture slotted between dynamic, moving sequences to give practitioners a moment to recalibrate and reset.
isn’t to attain shapes, it’s to cultivate awareness in body and mind, so the aim is to feel and connect with the sensations that the pose offers. To counteract any tightness across the back, bend the knees, softly like in #2 or more deeply like in #3, but keeping the hips at the highest point. Lightly draw navel to spine to keep sit-bones up and lengthen out the lower back. By driving the heels towards the earth, strength is activated across the legs – fine if heels reach the mat like #1, otherwise just let them hover like #2 or #3 with knees bent. Another common mistake is to dump the weight into the shoulders and often, this is done even without the person being aware. They are holding up without channelling any energy through the body, simply sinking into the pose. Over-time, a strain to the shoulders begin to emerge. Spread out the fingers, ground through knuckles and heels of the palm to engage the muscles in the arms, and actively push away from the mat so it feels like you’re lengthening from the wrists to the shoulders and across the torso to the waist. Allow the neck to hang gently towards the ground. These adjustments should also bring a feeling of space across the chest and upper back. A pose that appears simple but is full of nuanced complexities to perform., it offers strengthening and stretch qualities throughout the body but requires a fine balance of effort between arms, torso and legs so we don’t find ourselves burdening an area more than the other. Once you activate and direct your energies effectively, the pose will bring a feeling of length and lightness. As a gentle inversion, it supports circulation and activates parasympathetic nervous system, to bring a calming, relieving quality. *A section of the story appears on my IG post, click on the icons below to follow me! Some of you who've been to my classes or follow my posts would know how much I attribute the mood and energy of a room, to the role of music and how much it can help in this aspect. Music can absolutely be a complementary and contributing element to setting and creating the scene. And to find inspiration, I try to search with an open mind. I try not to restrict myself by looking across different genres and a broad spectrum of musical styles when I'm putting together compilation for different moods, sequences and moments of the day. Using a wide variety of sounds for this particular playlist - Set 25 - I've combined tribal, primordial drums with ambient electronic sounds and sweeping, keyboard scores, the intent is to encourage a lift of spontaneous energy and enhance the sense of sooth and calm. I hope this playlist will make a wonderful companion if you're practising at home and looking to fill the silence in the background. Spotify Link - https://open.spotify.com/playlist/0GmgqfKj7H1SaKrGiYhpqu?si=Pp0ac0kEQ5KV6X8tZcxahQ 
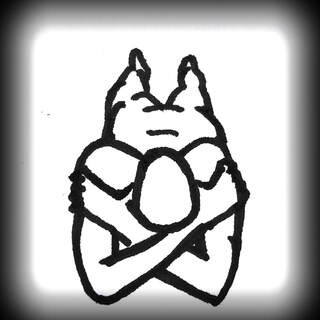
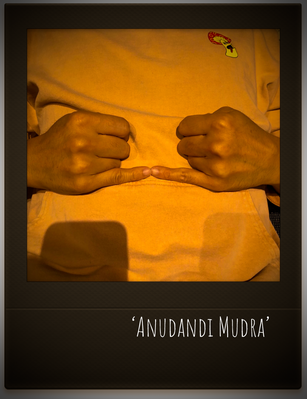
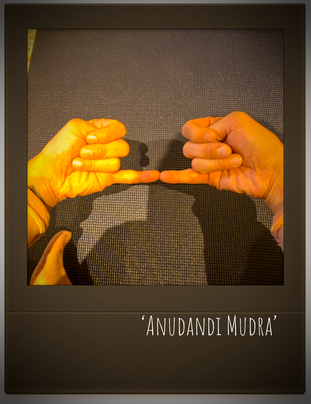
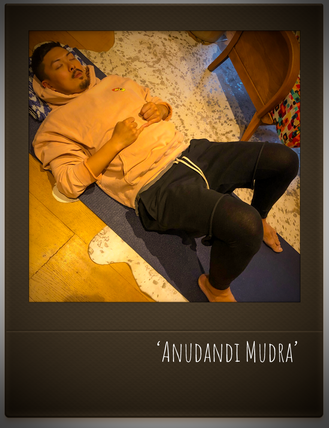 Anudandi Mudra ‘Gesture of the Backbone’ Our general encounters with mudras are typically low just from attending open public yoga classes. Few of us, and that extends even to the teachers, would even realise that there’s a mudra for just about every common condition. One of the most widespread complaint of our time, a physical ailment that troubles many of modern society is back pain, especially the lower back. Our spinal health has deteriorated over the decades from poor posture and bad sitting habits, and as a result we find ourselves suffering from discomfort in the area. Unfortunately, it isn’t a condition that can be cured, however its pain can certainly can be reduced and managed so it isn’t quite as debilitating. In Yoga Therapy, we explore ways to help the symptoms of pain by looking at the available yogic tools in our repertoire and mudras are one of options that we can use on its own or in combination with other tools. ‘Anudandi’ translates as ‘spine’ in Sanskrit and its core quality is to offer back pain relief. When executing this gesture, breath and awareness are directed to the entire back – a calm, rhythmic, wavelike motion is felt across the spine, flowing up and down, energetically, to encourage tension release in the muscles and bring a greater sense of comfort. Method – 1. Sitting cross-legged is a possible option, however if there’s discomfort in the back, it’s best to lie down instead, with knees bent and feet on the ground so that the spine is place neutral across the mat. 2. Wrap fingers around the thumb to create a fist. Extend the little fingers and touch the tips of them together. 3. Rest heel of palms on the lower ribs with little fingers running across the top of the belly, allowing elbows to sit spaciously by the side of the body. 4. With eyes closed, bring attention inwards and begin to shift your focus to the breath. Try to breath from the nose and activate ‘Ujjayi breath’ if it’s in your practice. Otherwise, just breathing naturally and regardless of which breath you go for, you want it to be deep and steady with a soft quality, nothing forced or exerted. 5. Inhale to feel a nourishing sensation rise from base to top of your spine. Exhale to feel a sensation of letting go from top to base of the spine. Allowing your back to soften into the ground with each breath out. *A part of this article appears on my IG post. Click on icons below to follow me.
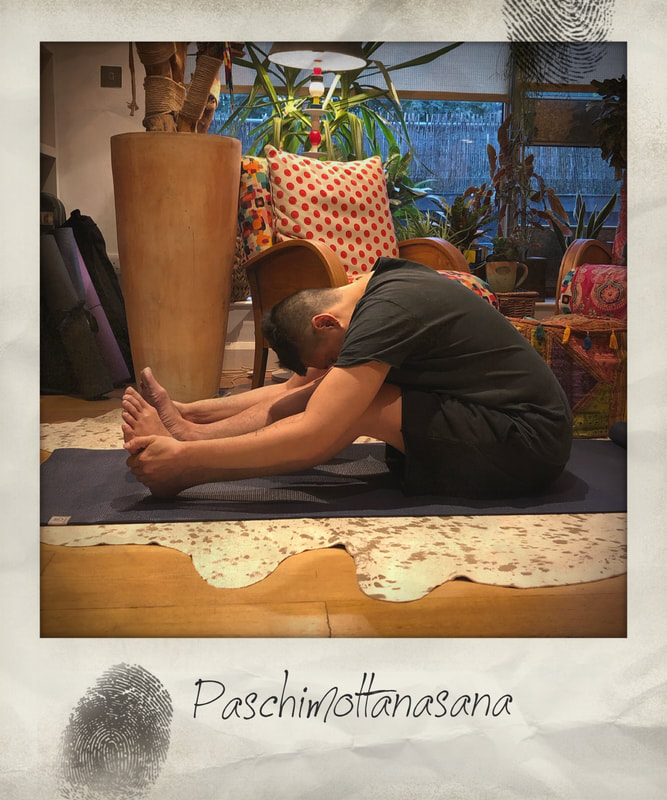
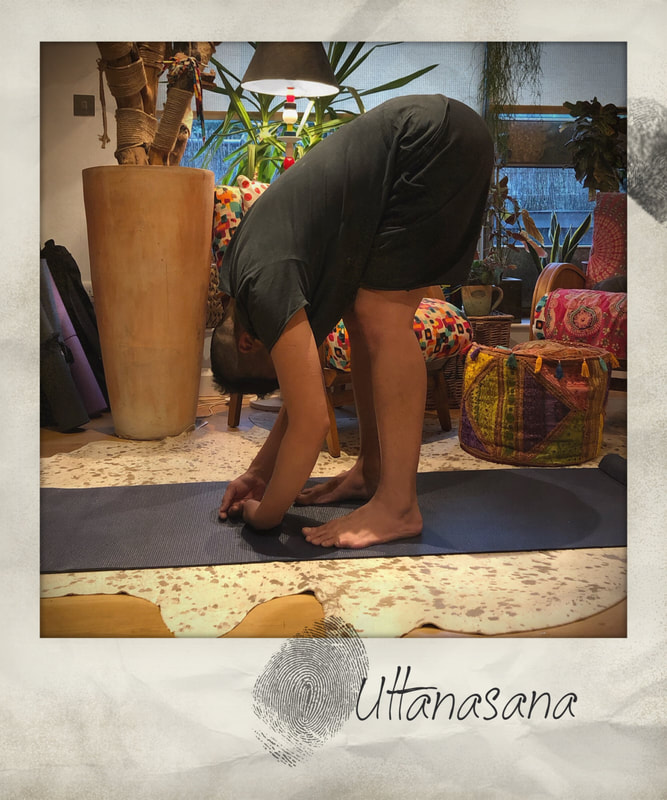
It’s just what our brain does habitually – we compartmentalise things to help us understand them quicker and more easily. Male or female, teacher or student, client or therapist, like or dislikes… our brain is like an automatically filing system that instantly allocates a set of terms on objects or situations we come across in order for us to comprehend it. Many of us learn to practice yoga or were introduced to them, during teacher training, as families of asanas (poses). We group them by their type – standing, seated, lying down, inverted – and then by their functions – forward folds, backbends, arm balances, twists and inversions, and through categorising, it has made it easier to understand these postures, what they do and where best to put them within a Vinyasa sequence. Compartmentalising is a quick way to help us come to conclusions and decisions so it’s undoubtedly a useful tool, however when our brain gets stuck with these compartmentalised concepts, it ends up becoming counterproductive, discouraging a creative form of thinking and restricting a more adaptable and versatile approach towards applying these tools, which are meant to assist us in the first place. I talked about Paschimottanasana (Seated Forward Fold) in one of my recent posts. In the story, I presented 2 different ways of performing the pose that are commonly seen in the yoga studio and asked if anyone felt that one alignment was more correct than the other. The moral of the story however, were that both alignments are equally correct. It just depended on the results you were hoping to achieve out of the pose. So for this post, I thought I’d return to Paschimottanasana again to make my point. It’s a pose that many people struggle with, typically because of tight hamstrings or a stiff lower back. The toes become a sort of a goal and you see practitioners trying so hard to reach it, heaving and edging themselves forward with quite limited results. The tightness in the hamstrings or lower back become so much more apparent in these moments. In several of my classes recently, I’ve got students to do Uttanasana instead. With a bit of cueing and instructions, you instantly notice an increased range – they fold deeper, the fingers dangle closer to the toes and many report a sensation of release across the spine and at the back of their thighs. However, most fail to notice that they are essentially performing Paschimottanasana, except their on the feet. They compartmentalised the situation – the goal is to touch their toes in a seated forward fold – when in fact, they are closer to their goal (of reaching the toes) than they realise. How is it that their range increases so easily with just a switch of position? It stems from the concept of kinematic constraints. A body with no restriction is free to move in any direction, but when we restrict motion from any of the movement planes – top or bottom and front, back or sides for example – it leads to a limitation of movement in other planes. In Paschimottanasana, the entire lower body is fixed to the ground, which instantly makes it more difficult to fold forwards. When we switch a person to standing, only the bottom is fixed to the ground while the rest of the body is free to move, hence why he/she’s able to reach further towards the feet in Uttanasana. In the end, none of the above matters so much, what’s more important is to have that freedom of mind and thinking. If you see a student struggling so hard to reach for the toes in a Seated Forward Fold, maybe it’ll help more to offer him to stand and fold instead? Our minds are alive and we can start to look at the poses in a more dynamic manner to help us achieve the results we hope to bring to the person. A part of this article appears on my IG post, click on icons below to follow me.
I was eager to know so I turned to the three key classical hatha yoga texts – Hatha Yoga Pradipika, Shiva Samhita and Gheranda Samhita – for answers. All of them claim the existence of 84 asanas though none reveals what these 84 poses are. What binds them are that their all dedicated to the practice of meditation, which meant that the techniques highlighted from asanas, breath-work (pranayama) to cleansing (kriyas), are all directed towards this goal.
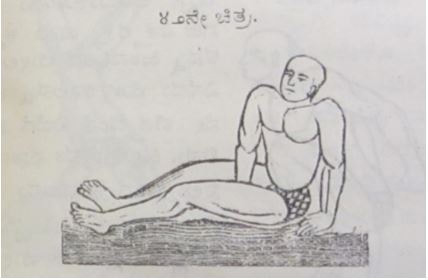
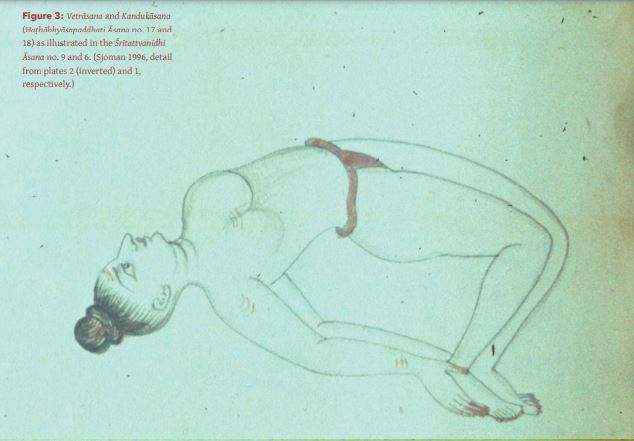
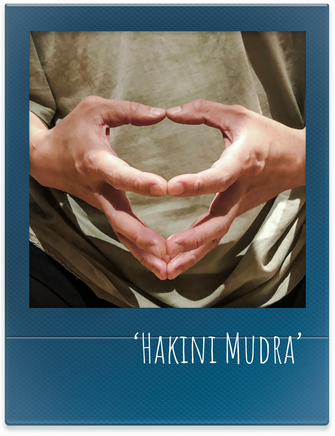
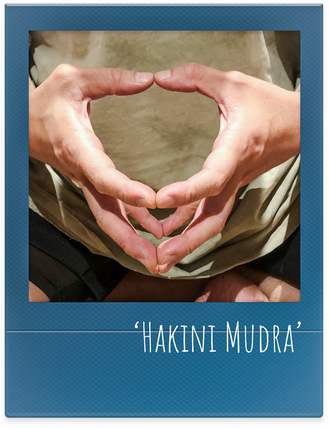
One of the most challenging part of tracing yoga’s history is the lack of documentation. Instructions were passed down through word-of-mouth, from teacher to student, so there’s distinct lack of historical information and teachings. Correct me if I’m wrong, but even as I brought my search to Light on Yoga by BKS Iyengar, a 1966 publication with over 200 poses documented, that’s considered the bible of modern yoga, the handstand was still missing. So… has a handstand really existed for centuries? After-all, there are 84 asanas, could it be within the selection, just undocumented? As I delved deeper, I finally came across a verse that implicates a handstand in Hathaabhyasapaddhati, an 18th century Hatha yoga manual in Sanskrit attributed to Kapala Kurantaka, the only known work prior to modern yoga to describe elaborate asana sequences. The translation instructs that “having supported [himself] with the palms of both hands on the ground and lifting the toes up [into the air, the yogi] should dance on the palms of the hands. [This] is the ‘inverted dancing’ [pose]” – reads like a handstand to me! In fact, some of the sequences documented are so out-of-this-world, it almost sound fantastical. 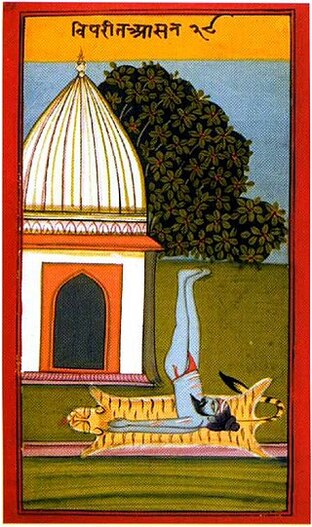 Indeed, the manuscript proves that these physically advanced poses have existed in history, but faced with the question of their relevance to a student and class today, I genuinely feel that it becomes the conviction of the teacher. As a disciple of yoga, I had practised for a decade without feeling the urge to achieve a handstand, yet when I resolved to train as a teacher, I began to feel a need to. All around me, I started noticing - in the class, on social media - the acclaimed teachers were all showcasing these highly challenging poses. So the months leading up to my training followed by the months after, I practised relentlessly, desperate to get it. Somehow I’ve convinced myself that achieving some of these inversions and arm balances were part of becoming a good teacher.  As teachers, it’s easy to get caught up with teaching asanas - the movement, alignment, form - it’s visual and tangible, which makes it accessible, even though we all appreciate and acknowledge that yoga goes beyond the pose, so there’s much more that we can draw a class's attention to, like the subtle energy or mind, body and breath awareness. During my 20 years of practice, there was a long period where I plateaued. My body had gotten so used to the asanas that it no longer requires much effort to execute or hold them. I was moving from style to style, trying different types of yoga, hoping to find that ‘yogic feeling’ again. It became this cycle where I’d get used to a practice and have to move on to the next. I can't remember when it finally fell into place, but the sensations generated from the poses, started to amplify through my consciousness - the internalised sound of my breath, the energetic shifts from my movements, a sensitivity to proprioception and spatial awareness - really noticing and feeling what’s going on inside the body, a heightened sense of interoception. This realisation that poses were just shapes and their relatively fixed but embodied by us, they come alive! We are what makes them dynamic. Perhaps it’s all part of a journey of learning to teach, but over time, my priorities of what makes a good teacher have shifted significantly... the art of watching and listening, the ability to sense the needs of who stands before you... Teaching people, not poses. *Top 4 images from BIRCH & SINGELTON - The Yoga of the Haṭhābhyāsapaddhati ** Bottom 2 illustrations from Joga Pradipika 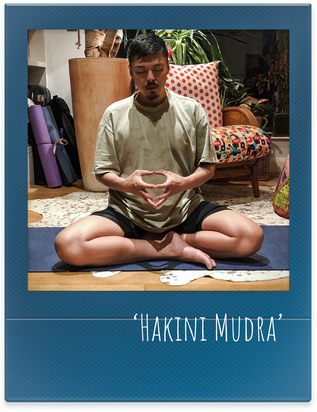 Hakini Mudra ‘Gesture of the Goddess Hakini’ Hakini is the Hindu goddess who presides over ‘Ajna’, our 3rd eye, the chakra of inner wisdom and clarity that encourages a greater awareness for mind and body. The mudra helps with the integration of all areas of the body and its key function is to support Dirgha Pranayama, ‘Full Yogic Breathing’. Some of you may remember that I presented Purna Svara Mudra recently, which shares a similar intent and purpose, but can be a difficult gesture to hold; Hakini makes a perfect substitute in this instance. Hakini Mudra brings balance and harmony to all levels of our being, from the physical to the energetic; enhancing circulation to support the functioning of our systems, cultivating equilibrium within the subtle body (our vayus and first 6 chakras)… on a spiritual level, the gesture directs our awareness to the 3rd eye, nurturing a sense of wholeness and greater connection with the subconscious mind.
Method: 1. Place arms by the sides of the lower ribs with palms facing one another in a seated position. 2. Touch the tips of all fingers and thumbs together gently, creating a spherical shape with the hands. 3. Shoulders are relaxed, elbows slightly away from body and spine is naturally aligned, keeping a lightness all throughout the arms and palms. 4. With mouth close, lightly press tongue to roof of the mouth, just behind the top set of teeth and breathe through the nose. 5. Observe the movement of your breath – Inhale > breath rises from navel to sternum, so belly, ribs and chest expands Exhale > breath descends from sternum to navel so belly, ribs and chest contracts Gradually as you breath, begin to feel the entire body expanding/contracting with your inhale/exhale, giving you a sense of calm and wholeness. Note: Mudra can also be used when lying down on the back. *A shorter version of this post appears on my IG. |
Hongyi the yogiFull-time yoga teacher & trainee yoga therapist in London. Eager to share, eager to learn! Archives
July 2021
Categories |


 RSS Feed
